Seeking a broader comparison of tools? Check out our guide to thebest screenshot tools for Windows, covering options suitable for quick captures, annotation, documentation, sharing, and automation.
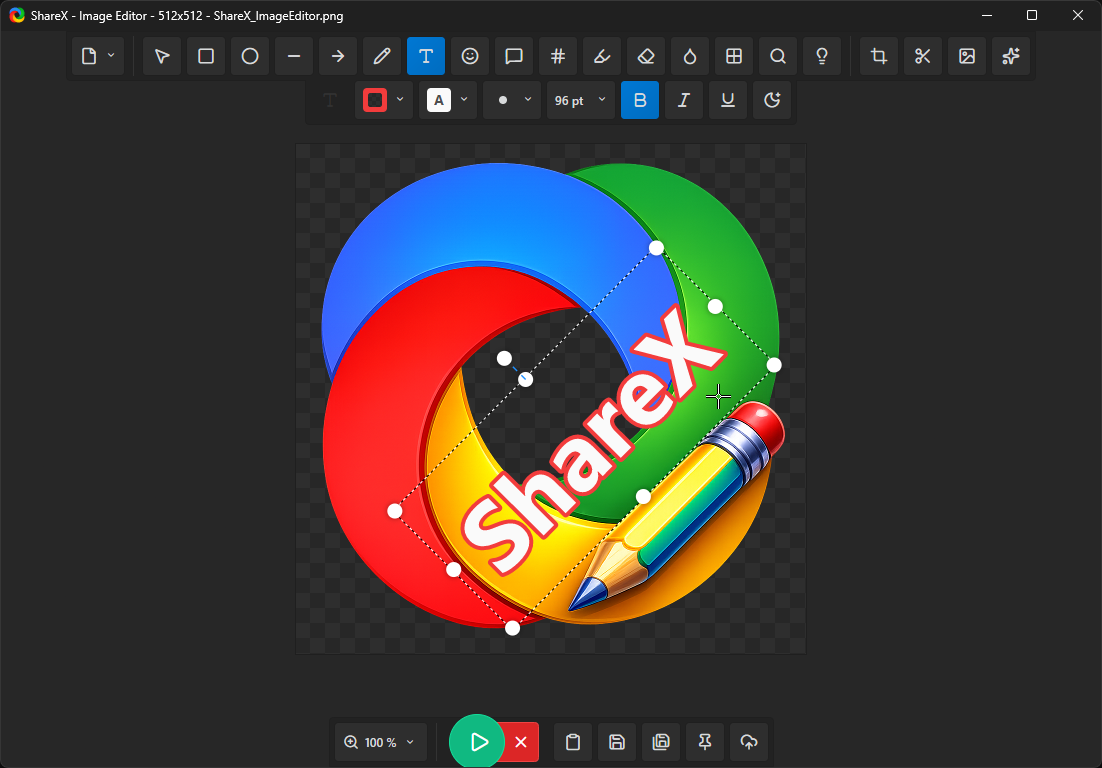
About the ShareX Image Editor
The ShareX image editor is a built-in utility designed for screenshot annotation and basic image manipulation. It enables users to mark up screenshots, obscure sensitive details, trim images, add explanations, insert text, and prepare captures for immediate copying, saving, uploading, or routing to other post-capture actions.
This editor is frequently utilized for creating software tutorials, submitting bug reports, generating documentation screenshots, crafting support responses, and performing quick image adjustments when a dedicated graphics application isn't needed. Its integration with ShareX's capture workflows allows you to take a screenshot, highlight key areas, redact private information, and then proceed with uploading or saving, all from the same interface.
The Older Image Editor
By default, ShareX uses the updated image editor. To use the previous version, enable it inTask settings -> Tools -> Use legacy image editor.
The first time you launch the image editor, ShareX might also present an editor selection prompt. Choosing the legacy editor there will save this preference.
Accessing the Image Editor
You can access the image editor in various ways, depending on whether you intend to modify a fresh capture, an existing file, or the most recent completed task.
- After capture tasks: Open the Post-capture actionsmenu to enable it.Open in image editorWhen enabled, every supported capture type will open within the image editor before any other post-capture processes proceed.
- Quick task options: If you access the quick task menu following a capture, pick a task that involves theAnnotate.
- Tools menu: Open Tools -> Image editorto launch it manually. Should no image be provided, the editor will initiate its startup sequence, letting you select or create an image.
- Hotkey: Set up or modify a hotkey, assigning its task to theTools -> Image editor. If the hotkey is executed with a file path, ShareX will open that specific image; otherwise, the editor's startup flow will appear.
- Main window task listing: In the main window, right-click an image task and chooseEdit image.
- Main window thumbnail action: If the thumbnail click actions are set toEdit image, clicking an image task's thumbnail will open it in the editor.
- Task completion notification: Locate the task-completed notification in the bottom-right corner and middle-click it. By default, middle-clicking performs theAnnotate imageaction. You can change this behavior underTask settings -> General -> notification click actions.
- History displays: Open History or Image history, select an image item, then use the edit image action.
- Windows Explorer context menu: In Explorer, if ShareX shell integration is active, right-click an image file and selectEdit with ShareX.
- Command line: To open a specific image in the editor, execute ShareX with
-ImageEditor "path\to\image.png"followed by the image path.
When the editor launches as part of an after-capture task,Enterwill proceed with that task, applying your edits.Escwill terminate the task. The bottom toolbar also provides options to continue, cancel, copy, save, save as, pin to screen, and upload.
Standard editing procedure
A typical image editing process within ShareX involves these steps:
- First, capture a screenshot using any of ShareX's available methods.
- Then, either automatically or manually, open the screenshot in the image editor.
- Next, add annotations like arrows, rectangles, text, highlights, step numbers, or speech balloons.
- Conceal private information using tools such as blur, pixelate, smart eraser, crop, or cut out.
- Finally, review your work, then copy, save, upload, pin, or continue with any configured after-capture tasks.
Annotations remain editable until they are flattened or the final image is generated. This allows you to select an existing annotation, move or resize it, change its color or thickness, duplicate it, delete it, or adjust its layering before completing the editing process.
Editing screenshots for documentation
For creating tutorial images and documentation screenshots, prioritize using a few clear annotations rather than marking everything at once. Arrows are effective for indicating precise controls, rectangles and ellipses work well for larger interface regions, and the Step tool is beneficial when a screenshot needs to illustrate a sequence of actions.
Text and speech balloons can provide context directly within the image. Ensure text is concise enough to remain legible if the image is resized for a website, help article, or support ticket. Before sharing screenshots publicly, verify that no sensitive details like names, email addresses, file paths, access tokens, private URLs, or account information are visible.
Hiding sensitive information
ShareX offers several tools for obscuring private data in screenshots:
- Blurgently blurs a chosen area, ideal for quickly masking readable text.
- Pixelatereplaces details with large, distinct blocks, making the redaction more visually evident.
- Smart EraserBlends with nearby colors to conceal small details.
- CropRemoves all content located outside the boundaries of the chosen area.
- Cut OutEliminates unnecessary horizontal or vertical space from the image's center.
When dealing with highly sensitive data, removing it by cropping from the screenshot is typically more secure than simply obscuring it visually. After redaction, always magnify and inspect the modified region before sharing or uploading the image.
Annotation Features
Select
Existing annotations can be selected and moved. Once an annotation is selected, you can use the mouse or arrow keys to reposition it, create a duplicate, delete it, adjust its layer order, or modify its specific tool settings in the bottom toolbar.
Rectangle
Draw either an outlined or filled rectangle. Rectangle configurations include border color, fill color, thickness, corner radius, along with other shared shape adjustments.
Ellipse
Create an ellipse or circle. This is useful for oval-shaped callouts, circular highlights, and both filled or outlined markers.
Line
Draw a straight line connecting two points. HoldShiftto force the line angle to snap to 45-degree increments as you draw.
Arrow
Draw an arrow between two points. Arrows adopt the chosen color and thickness, and can be repositioned or resized after their creation.
Freehand
Draw freehand strokes using the chosen color and thickness. This is effective for encircling, underlining, or quickly highlighting sections of an image.
Text
Insert text that can be edited. Text adjustments include color, outline color, font size, bolding, italics, and underlining.
Speech Bubble
Create a speech balloon containing text. The balloon supports border color, fill color, text color, font size, thickness, and corner radius settings.
Step
Place numbered markers that automatically increase. Use this for step-by-step screenshots where each marker identifies a specific action or area.
Image
Embed another image as an annotation. Image files can also be dragged or pasted directly into the editor.
Emoji
Insert an emoji as an annotation. This is ideal for a quick visual marker, reaction, or decorative element without needing to manually import an image file.
Cursor
Insert a graphic of a cursor as an annotation. This is helpful in tutorial screenshots to pinpoint where the pointer should be, especially if it wasn't captured or needs clearer placement.
Highlight
Draw a translucent highlighting region. It is effective for emphasizing text or UI areas without completely obscuring the content beneath.
Intelligent Eraser
Paint over an area using a color sampled from its surroundings. This feature helps to quickly hide text or small details by blending them into the adjacent image content.
Blur
Apply a blur to a selected rectangular area. Use this to hide sensitive details like names, email addresses, tokens, or account information.
Pixelate
Pixelate a chosen rectangular area. Pixelation offers an alternative method to obscure sensitive information, clearly indicating that the area has been redacted.
Magnify
Generate a magnified region. This allows you to enlarge small UI details while maintaining their context within the screenshot.
Spotlight
This function darkens the area around your selection, drawing focus to one part of a screenshot without removing other elements.
Crop
Trim the image to a chosen area. Before finalizing, you can reposition or resize the cropping overlay.
Cut Out
Remove a vertical or horizontal segment from the image and then rejoin the remaining sections. This feature is useful for shortening lengthy or wide screenshots by eliminating unnecessary blank space.
Background Tools
The image editor also provides background tools for preparing screenshots that require additional spacing or specific presentation styles. These choices let you add margins, padding, smart padding, rounded corners, shadows, adjust aspect ratios, and include custom backgrounds.
Depending on the chosen option, backgrounds can be transparent, solid colors, gradients, images, or wallpapers. These tools are valuable for crafting polished screenshots for things like release notes, social media posts, documentation, comparison graphics, and website content.
Image Effects
Image effects are applicable when the entire image needs visual modification, rather than just a single annotation. Effects are grouped into categories such as manipulations, adjustments, filters, and drawings. Use them for quick changes like improving contrast, altering colors, applying filters, or adapting an image to a particular visual style.
For documentation and support screenshots, apply effects sparingly to ensure the image accurately reflects the actual interface.
Editor Settings
The editor options are accessible from theFilemenu. These settings manage the editor's look, how it behaves, and how it integrates with tasks:
- Follow system theme and Themedetermines if the editor uses your system's theme or a specific theme you select.
- Follow system accent color and Accent colormanages the editor's accent color.
- Remember window staterestores the editor window's last position and size.
- Show exit confirmationprompts you before closing if there might be unsaved work.
- Zoom to fit on openautomatically adjusts the image to fit within the editor view when opened.
- Quick cropmakes cropping quicker for users who frequently trim screenshots.
- Auto close editor on taskAutomatically closes the editor after you perform a task action.
- Auto copy image to clipboardThe outcome is copied automatically.
- Show insert image dialogDetermines whether ShareX prompts you on how to embed images that are pasted or dropped.
Managing, Storing, and Sharing Images
The editing process concludes with options available in the bottom toolbar. You can either continue your existing after-capture workflow, cancel the operation, copy the edited image to your clipboard, save it, save it as a new file, pin it to your screen, print it, or upload it using your configured ShareX upload destinations.
If the editor was launched from an after-capture task, continuing will apply your edits before any subsequent tasks run. For instance, a capture workflow might first open the editor, then proceed to copy the edited image, save it to disk, upload it, or execute other defined actions.
Tips for Effective Screenshot Annotations
- To ensure readability on both light and dark interfaces, use high-contrast colors for your arrows, rectangles, and text when annotating.
- Use Step markers when it's crucial for the viewer to follow actions in a precise sequence.
- When you want to direct attention without obscuring the original content, employ Highlight or Spotlight tools.
- For small buttons, icons, or text that would be difficult to discern at the standard screenshot size, use the Magnify tool.
- Ensure that redactions are consistently applied across the entire screenshot to prevent private information from being overlooked.
- Only flatten annotations when you are ready for them to become a permanent part of the image.
Keybinds
Common
| Keybind | Description |
|---|---|
| Delete | Delete selected annotation |
| Shift + Delete | Delete all annotations |
| Ctrl + Z | Undo |
| Ctrl + Y | Redo |
| Ctrl + Shift + Z | Redo |
| Ctrl + X | Cut selected annotation |
| Ctrl + C | Copy selected annotation |
| Ctrl + V | Paste annotation, image, or supported clipboard content |
| Ctrl + D | Duplicate selected annotation |
| Ctrl + Shift + F | Flatten annotations into the image |
| Arrow keys | Move selected annotation by 1 px |
| Shift + Arrow keys | Move selected annotation by 10 px |
| Home | Bring selected annotation to front |
| Page up | Move the chosen annotation to the front. |
| Page down | Move the chosen annotation back one layer. |
| End | Send the chosen annotation all the way to the back. |
| Right click | Open the menu for editor options. |
| Esc | Cancel the current crop, clear the active selection, or stop the editor's task. |
Editor Functions
| Keybind | Description |
|---|---|
| Enter | Proceed with post-capture tasks, applying all modifications. |
| Esc | Cancel |
| Ctrl + Shift + C | Copy the image to your clipboard. |
| Ctrl + S | Save image |
| Ctrl + Shift + S | Save the image file as… |
| Ctrl + P | Pin the image to the display. |
| Ctrl + Shift + P | Print image |
| Ctrl + U | Upload the image file. |
Display Controls
| Keybind | Description |
|---|---|
| Hold middle click | Pan image |
| Ctrl + Mouse wheel | Zoom in or out, centered on your cursor. |
| Zoom picker | Select a predefined zoom level. |
| Zoom selector -> Fit to screen | Zoom to fit |
Tools
| Keybind | Description |
|---|---|
| V | Select |
| R | Rectangle |
| E | Ellipse |
| L | Line |
| A | Arrow |
| F | Freehand |
| T | Text |
| O | Speech Bubble tool |
| N | Step |
| I | Image |
| J | Emoji |
| K | Cursor |
| H | Highlight |
| W | Smart Erase tool |
| B | Blur |
| P | Pixelate |
| M | Magnify |
| S | Spotlight |
| C | Crop |
| U | Cut Out |
During Drawing or Editing
| Keybind | Description |
|---|---|
| Shiftwhen drawing a line or arrow | Align angle to 45-degree increments. |
| Enterwhen a crop is active | Confirm the crop area. |
| Double left clickwithin the crop area | Confirm the crop selection. |
| Right clickwhile the crop function is active | Cancel crop |
| Right clickduring the process of drawing a crop or cut-out selection | Discontinue drawing the current region |
Context Menu (Right-click)
| Keybind | Description |
|---|---|
| Ctrl + Z | Undo |
| Ctrl + Y | Redo |
| Delete | Delete |
| Shift + Delete | Delete all |
| Ctrl + Shift + F | Flatten |
| Ctrl + X | Cut |
| Ctrl + C | Copy |
| Ctrl + V | Paste |
| Ctrl + D | Duplicate |
| Home | Move to the forefront |
| Page up | Move one step forward |
| Page down | Move one step backward |
| End | Move to the background |
Task Menu at Bottom
| Keybind | Description |
|---|---|
| Enter | Proceed with / execute post-capture operations |
| Esc | Cancel |
| Ctrl + Shift + C | Copy the image to your clipboard |
| Ctrl + S | Save image |
| Ctrl + Shift + S | Save the image as… |
| Ctrl + P | Keep the image visible on screen |
| Ctrl + Shift + P | Print image |
| Ctrl + U | Upload the image file |