ShareX on Windows 11
What changes when you run ShareX on Windows 11, and the settings worth checking after a clean install.
ShareX is a powerful and versatile screen capture and file sharing tool. It integrates seamlessly with the Windows operating system, providing a robust set of features for capturing screenshots, recording video, and managing files. This guide focuses on how ShareX operates and can be optimized specifically for users running Windows 11, addressing common questions and considerations unique to this version of Windows.
Installing ShareX on Windows 11
Installing ShareX on Windows 11 is a straightforward process, identical to installation on previous Windows versions. You can obtain ShareX through several convenient methods, ensuring you have the latest stable version.
Using the Installer from the Website
The most common and recommended way to install ShareX is by downloading the installer directly from the official website.
- Visit the ShareX download options page.
- Locate and click the "Installer" button to download the executable file.
- Once the download is complete, run the installer.
- Follow the on-screen prompts to complete the installation. You can choose the installation path and whether to create desktop shortcuts.
- After installation, ShareX will typically launch automatically and place an icon in your system tray.
Installing via the Microsoft Store
ShareX is also available through the Microsoft Store, offering a sandboxed installation and automatic updates managed by Windows.
- Open the Microsoft Store application on your Windows 11 PC.
- Search for "ShareX".
- Select the official ShareX application from the search results.
- Click the "Get" or "Install" button to download and install.
The Microsoft Store version behaves largely the same as the installer version, though some advanced integrations or custom paths might be handled slightly differently due to the sandboxing. For most users, either option provides full functionality.
Installing via Package Managers (Winget, Chocolatey)
Advanced users might prefer to install ShareX using a package manager like Winget (built into Windows 11) or Chocolatey.
- Winget: Open Windows Terminal (Admin) and type
winget install ShareX.ShareX - Chocolatey: Open Command Prompt (Admin) or PowerShell (Admin) and type
choco install sharex
These methods are convenient for automated installations or managing software updates across multiple machines.
The Print Screen Key on Windows 11
Windows 11, by default, reassigns the Print Screen key's behavior to launch the Snipping Tool. This can interfere with ShareX's ability to capture screenshots directly using that key. To ensure ShareX can utilize the Print Screen key for its extensive
screenshot modes, you need to adjust a Windows 11 setting.
Reassigning Print Screen to ShareX
- Open the Windows 11 Settings app. You can do this by right-clicking the Start button and selecting "Settings" or by pressing
Win + I. - Navigate to "Accessibility" in the left-hand menu.
- Scroll down and select "Keyboard".
- Find the option "Use the Print Screen key to open Snipping Tool".
- Toggle this setting to "Off".
After disabling this Windows 11 default, ShareX will be able to intercept the Print Screen key press. You can then configure its action within ShareX's
hotkey setup. For example, you might set Print Screen to "Capture Region" or "Capture Fullscreen" directly in ShareX's Hotkey settings. If you previously used ShareX on Windows 10, this is a key difference to note, as Windows 10 did not default to this behavior.
Rounded Corners, Shadows, and Window Capture
Windows 11 introduces a refreshed visual design with elements like rounded window corners and subtle shadows around application windows. ShareX handles these aesthetic changes gracefully during window capture.
Capturing Rounded Corners and Shadows
When you use ShareX's "Capture active window" or select a specific window from the "Window list" capture options, ShareX is designed to accurately capture the visual representation of that window.
- Rounded Corners: ShareX will capture the rounded corners of Windows 11 applications as they appear on your screen. The captured image will reflect this modern design element.
- Shadows: ShareX also captures the drop shadows that Windows 11 applies to active windows. This results in a screenshot that looks faithful to how the window is presented on your desktop, adding depth to the captured image. The extent of the shadow capture might depend on your specific capture settings within ShareX, such as whether you include the transparency of the shadow or a solid background behind it.
If you prefer not to include shadows or rounded corners, you would typically need to either use ShareX's built-in image editor to crop them out, or disable visual effects in your Windows performance options (though this is generally not recommended as it affects the entire system's appearance). ShareX's default behavior is to capture what you see, including these visual enhancements.
Scaling, Multi-Monitor, and HDR Displays
Windows 11 continues to improve support for various display configurations, including high-DPI scaling, multiple monitors with different resolutions, and High Dynamic Range (HDR) displays. ShareX is built to work effectively across these diverse setups.
High-DPI Scaling
Windows 11 automatically scales applications to maintain readability on high-DPI (e.g., 4K) displays. ShareX respects these scaling settings. When you capture a region or a window on a scaled display, ShareX captures the content at its rendered resolution, not the raw pixel resolution of the display. This ensures that your screenshots are clear and accurately sized, reflecting what you see on your screen. If you experience any blurriness or incorrect sizing, ensure your display drivers are up to date and check ShareX's application settings under "Application settings" > "General" > "DPI scaling compatibility" for potential adjustments, though typically default settings work well.
Multi-Monitor Setups
ShareX handles multi-monitor environments seamlessly.
- Capture Fullscreen: When you select "Capture Fullscreen" from the main menu or via a hotkey, ShareX will capture the entire virtual desktop spanning all connected monitors.
- Capture Monitor: This option allows you to select a specific monitor to capture. ShareX will present a list of your connected displays (e.g., "Monitor 1", "Monitor 2") for you to choose from.
- Capture Region: You can define a capture region that spans across multiple monitors. ShareX will correctly stitch together the captured areas from each display into a single image.
When capturing across monitors with different scaling factors, ShareX typically captures each segment at its rendered size and combines them. This can sometimes lead to slight discrepancies in pixel density if you combine images captured from monitors with vastly different DPI settings and then view the combined image at 100% zoom. For consistent results, it's often best to capture individual monitors or ensure all displays use similar scaling.
HDR Displays
HDR displays offer a wider range of colors and contrast. When capturing content on an HDR display with ShareX, the behavior depends on whether the capture process itself is HDR-aware.
- Standard Capture: By default, ShareX captures the SDR (Standard Dynamic Range) representation of your screen, even if you are viewing content in HDR. This means the colors in your screenshot will appear as they would if viewed on a standard SDR monitor, which is generally what you want for sharing images online or with non-HDR viewers.
- Color Accuracy: While the capture is typically SDR, ShareX aims for color accuracy within that standard range. You should not expect to see the full dynamic range or color gamut of HDR content directly in your ShareX captures unless specific HDR capture capabilities are implemented and configured. For most users, this default behavior is sufficient and avoids issues with HDR content appearing washed out or overly bright on non-HDR displays.
Snap Layouts, Virtual Desktops, and Capture Timing
Windows 11 introduces enhanced window management features like Snap Layouts and continues to offer Virtual Desktops. Understanding how ShareX interacts with these can optimize your workflow.
Snap Layouts
Snap Layouts allow you to quickly arrange windows into predefined layouts by hovering over the maximize button. When windows are snapped, they become distinct entities on your screen.
- Capturing Snapped Windows: ShareX's "Capture active window" or "Capture window list" options work perfectly with snapped windows. You can select an individual window within a snapped layout, and ShareX will capture just that window, including its specific dimensions as dictated by the snap layout.
- Capturing a Layout: If you want to capture an entire snap layout (multiple windows arranged together), you would typically use "Capture Region" and manually draw a box around the entire arrangement, or use "Capture Fullscreen" if the layout fills a single monitor.
Virtual Desktops
Virtual Desktops (accessed via Task View or
Win + Tab) help organize your workspace by allowing you to group related applications on separate desktops.
- Capturing on Current Desktop: ShareX captures only what is visible on your *current* active virtual desktop. If you trigger a capture hotkey, it will capture windows or regions from the desktop you are currently viewing. ShareX does not "see" or capture content from other virtual desktops that are not currently active.
- Switching Desktops for Capture: To capture content from a different virtual desktop, you must first switch to that desktop using
Win + Ctrl + Left/Right Arrowor by opening Task View and clicking on the desired desktop. Then, you can initiate your ShareX capture.
Capture Timing and Delays
Sometimes, you need to capture a fleeting moment, a context menu, or a tooltip that disappears when you interact with other applications. ShareX offers capture delay options to address this.
- Delay Before Capture: In ShareX's main window, under the "Capture" menu, many capture options (like "Region", "Fullscreen", "Window") have a submenu with delay options (e.g., "Region (Delayed)", "Fullscreen (Delayed)"). You can also configure a global delay in "Task settings" > "Capture" > "Delayed capture". This allows you to trigger the capture and then have a few seconds to set up the precise screen state (e.g., open a menu) before the actual capture occurs.
- Capturing Menus and Tooltips: For elements that disappear on mouse-click, using a delayed capture with a hotkey is ideal. Trigger the hotkey, then quickly open the menu or hover over the tooltip. After the delay, ShareX will perform the capture.
Startup, Tray Icon, and Notification Behavior
ShareX integrates into the Windows 11 environment, managing its startup, presence in the system tray, and how it delivers notifications.
Starting ShareX with Windows
By default, ShareX is configured to start automatically when Windows 11 boots up, ensuring it's always ready for use.
- To verify or change this setting, open ShareX's main window.
- Go to "Application settings" in the left-hand menu.
- Select "General".
- Under "Startup", ensure the "Run ShareX when Windows starts" checkbox is checked if you want it to launch automatically.
If ShareX is installed from the Microsoft Store, Windows 11 manages its startup permissions under "Settings" > "Apps" > "Startup", where you can toggle it on or off.
System Tray Icon
ShareX resides silently in your system tray (the area to the right of the taskbar, near the clock).
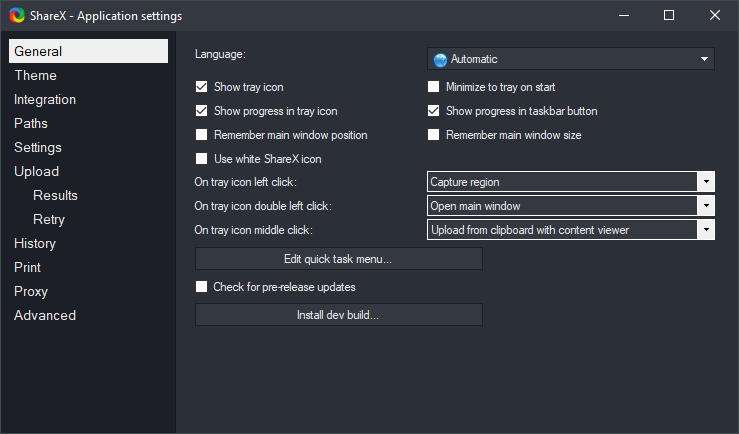
- Accessing ShareX: A single left-click on the ShareX icon in the tray opens the main ShareX window. A right-click displays a context menu with quick access to common capture modes, tools, and settings.
- Managing Tray Icons in Windows 11: Windows 11's system tray can sometimes hide icons. If you don't see the ShareX icon, click the upward arrow (^) icon next to the system tray to reveal hidden icons. You can also drag the ShareX icon from the hidden area into the main tray area for permanent visibility by going to "Settings" > "Personalization" > "Taskbar" > "Other system tray icons" and toggling ShareX on.
Notification Behavior
After a capture or upload, ShareX provides notifications to confirm the action. Windows 11 handles these notifications through its Action Center.
- Default Notifications: By default, ShareX displays a small toast notification in the bottom-right corner of your screen, indicating success (e.g., "Screenshot saved to clipboard" or "Upload complete"). These notifications fade away after a few seconds.
- Action Center Integration: If you miss a notification, it will be stored in the Windows 11 Action Center, accessible by clicking the date and time in the taskbar or pressing
Win + N. - Customizing Notifications: You can customize ShareX's notification behavior in "Application settings" > "Notifications". Here, you can enable or disable specific types of notifications (e.g., for capture, upload, or error), and even choose to play sounds.
- Windows 11 Notification Settings: For broader control over ShareX's notifications, go to "Settings" > "System" > "Notifications" in Windows 11. Find ShareX in the list of applications, and you can globally enable/disable its notifications, adjust their priority, or turn off notification banners and sounds.
Frequently Asked Questions
Does ShareX work natively on Windows 11?
Yes, ShareX is fully compatible with Windows 11. It's designed to integrate seamlessly with the Windows environment, offering all its features and functionalities on this operating system version without requiring any special compatibility modes or workarounds.
Can I use ShareX to record my screen on Windows 11?
Absolutely. ShareX includes robust screen recording capabilities, allowing you to record specific regions, windows, or your entire screen. You can configure various video and audio settings, and ShareX can even record GIFs, making it a versatile tool for creating tutorials, bug reports, or capturing gameplay clips.
Why isn't the Print Screen key working with ShareX on Windows 11?
Windows 11, by default, reassigns the Print Screen key to open the Snipping Tool. To use it with ShareX, you need to go to Windows Settings > Accessibility > Keyboard and toggle off the option "Use the Print Screen key to open Snipping Tool." After this, you can configure the Print Screen key's action within ShareX's Hotkey settings.
Are there any performance issues when using ShareX on Windows 11?
ShareX is generally lightweight and optimized for performance. You should not experience significant performance issues when using it on Windows 11, especially on modern hardware. Any perceived slowdowns are more likely related to system resources being consumed by other applications or specific capture settings (e.g., very high-resolution video recording).
Does ShareX support Windows 11's new visual features like rounded corners?
Yes, ShareX captures what is displayed on your screen, including Windows 11's visual enhancements like rounded window corners and subtle drop shadows. When you capture a window, these elements will be accurately represented in your screenshot, providing a faithful reproduction of the Windows 11 user interface.
Get ShareX for Windows
ShareX is free and open source. Install it, then come back and try the steps above.
Download ShareX