How to Take a Screenshot with ShareX
Every screenshot mode in ShareX, when to use each one, and what happens to the image after the capture.
ShareX is a powerful and free open-source tool for Windows that goes far beyond basic screen capture. It offers a wide array of options for capturing your screen, from specific regions to entire monitors, and provides robust post-capture workflows. This guide will walk you through the various ways to take a ShareX screenshot, ensuring you can capture exactly what you need, every time. Before diving into the specific capture methods, it's helpful to understand the flexibility ShareX provides. You can initiate captures from the main window, the system tray icon, or through custom
screenshot keyboard shortcuts. Each method offers a quick path to your desired capture type.
The Screenshot Modes ShareX Offers
ShareX provides a comprehensive set of capture modes to suit any need. Understanding these options is key to effectively using the ShareX screenshot tool. You can access most capture options from the main ShareX window under the "Capture" menu, or by right-clicking the ShareX icon in your system tray. Here's a breakdown of the primary screenshot modes:
- Region: Allows you to draw a custom rectangular area on your screen to capture. This is the most frequently used mode for precise captures.
- Window: Captures a specific application window. ShareX intelligently detects active windows as you hover over them.
- Monitor: Captures the entire content of a single connected display. Useful for full-screen application captures or multi-monitor setups where you only need one screen.
- Fullscreen: Captures all connected monitors as a single image.
- Last Region: Re-captures the exact same area as your previous "Region" capture, saving you time if you need to take multiple shots of the same on-screen element.
- Scrolling Capture: Captures the entire content of a scrollable window or webpage, even content that is not currently visible on screen.
- Text Capture (OCR): Uses Optical Character Recognition to extract text from a selected screen region, rather than taking an image.
- Screen Recording: Captures video of your screen activity. This can be configured to save as a video file or a GIF.
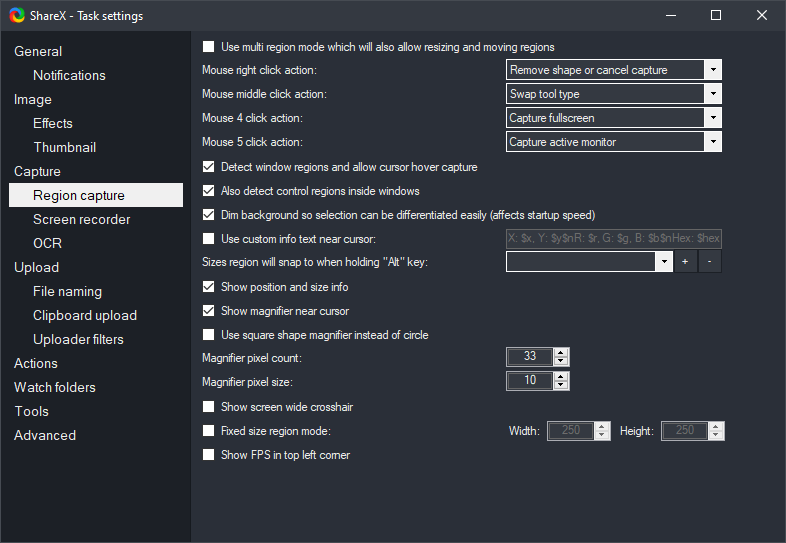
Each of these modes can be configured further in "Task settings" to apply various effects or automatically perform actions after capture. For a deeper dive into
how ShareX screen capture works in detail, refer to our dedicated guide.
Take a Region Screenshot
Capturing a specific area of your screen is one of the most common tasks, and ShareX excels at it. This method provides pixel-perfect control over what you include in your image. Many users find this capability makes
ShareX as a Snipping Tool replacement.
Capturing a Custom Region
- Open ShareX. In the main window, click "Capture" then "Region." Alternatively, right-click the ShareX system tray icon, hover over "Capture," and select "Region."
- Your screen will dim, and your mouse cursor will change to a crosshair.
- Click and drag your mouse to draw a rectangle around the area you wish to capture. As you drag, a magnified view near your cursor helps with precision, and dimensions (width x height) are displayed.
- Release the mouse button to complete the capture. The selected region will be captured, and ShareX will proceed with any configured after-capture tasks (e.g., opening the image editor, saving to file, or uploading).
For even more control, you can adjust the selection after drawing it. Before releasing the mouse button, you can use the arrow keys to move the selection pixel by pixel. After releasing, you can still drag the edges or corners of the selection box to resize it, or drag the entire box to reposition it. Pressing the `Enter` key or clicking inside the selection will finalize the capture. Press `Esc` to cancel.
Using "Last Region" for Repeated Captures
If you need to take multiple screenshots of the same exact area on your screen, the "Last Region" feature is incredibly useful.
- First, take a "Region" screenshot as described above.
- Later, to capture the same region again, simply go to "Capture" > "Last Region" from the main window or system tray menu. ShareX will instantly capture that exact area without you needing to redraw it.
For advanced users, the
region capture documentationoffers more technical details on its capabilities.
Capture a Single Window or Monitor
Sometimes you need to capture an entire application window or a whole display without manually drawing a selection. ShareX makes this quick and easy.
Capturing an Active Window
- Open ShareX. Click "Capture" then "Window," or right-click the system tray icon, hover over "Capture," and select "Window."
- As you move your mouse cursor over different open windows, ShareX will highlight them with a colored border (default is red).
- Click on the highlighted window you wish to capture. The entire content of that window will be captured.
This method is perfect for capturing dialog boxes, specific application interfaces, or browser windows. ShareX intelligently detects child windows and individual UI elements within an application, allowing you to capture even small panels or pop-ups.
Capturing a Specific Monitor
If you have multiple monitors and want to capture only one of them:
- Open ShareX. Click "Capture" then "Monitor."
- A submenu will appear listing your connected monitors, usually labeled "Monitor 1," "Monitor 2," etc.
- Click on the specific monitor you want to capture. The entire content of that display will be captured as a single image.
This is distinct from "Fullscreen," which would capture all monitors into one large image.
Capture the Full Screen
Capturing everything displayed across all your monitors is straightforward with the "Fullscreen" option. This is useful for demonstrating a multi-monitor setup or capturing a scene that spans across displays.
- Open ShareX. Click "Capture" then "Fullscreen." Alternatively, right-click the ShareX system tray icon, hover over "Capture," and select "Fullscreen."
- ShareX will immediately capture the entire visible area across all your connected displays as a single, large image.
Be aware that if you have multiple high-resolution monitors, the resulting image file can be quite large in terms of dimensions and file size.
Annotate Before You Share
ShareX includes a powerful built-in image editor that allows you to annotate, highlight, and modify your screenshots immediately after capture. This is invaluable for adding context, pointing out details, or obscuring sensitive information before sharing.
Using the Image Editor
By default, ShareX is configured to open the image editor after you take a screenshot. If it doesn't, you can enable this feature in "Task settings."
- After taking a screenshot, the ShareX image editor will open automatically (if configured).
- On the left side of the editor, you'll find a toolbar with various annotation tools:
- Rectangle, Ellipse, Line, Arrow: Draw shapes to highlight areas or indicate direction.
- Text: Add explanatory text to your screenshot.
- Step: Create numbered steps to guide viewers through a process.
- Blur/Pixelate: Obscure sensitive information such as personal details or passwords.
- Highlight: Emphasize specific text or elements.
- Crop: Trim unwanted parts of the image.
- Sticker: Add pre-defined icons or custom images.
- Select a tool, adjust its properties (color, thickness, font, etc.) using the options at the top of the editor, and apply it to your screenshot.
- Once you are finished annotating, click the "Save" icon (floppy disk) in the top-left corner, or simply close the editor. ShareX will then proceed with any remaining after-capture tasks, such as saving the file or uploading it.
The editor is highly customizable and offers many features beyond basic annotations. Explore
the ShareX image editordocumentation for a full list of capabilities.
Saving, Copying, and Uploading the Result
One of ShareX's greatest strengths is its highly configurable "After capture tasks" and "After upload tasks." These allow you to automate what happens to your screenshot once it's taken and optionally edited.
Configuring After Capture Tasks
You can find these settings in the main ShareX window under "Task settings" > "After capture tasks." Common options include:
- Open image in editor: (Enabled by default) Launches the built-in image editor.
- Save image to file: Saves the screenshot to a specified folder on your computer. You can configure the file name pattern, format (PNG, JPG, GIF, etc.), and quality.
- Copy image to clipboard: Puts the screenshot directly onto your clipboard, ready to be pasted into another application.
- Copy file to clipboard: Copies the image file itself to the clipboard, allowing you to paste it into file explorers or applications that accept file inputs.
- Perform actions: Execute custom actions on the captured image.
- Upload image: Automatically uploads the image to a configured destination (e.g., Imgur, Dropbox, your own server).
- Copy URL to clipboard: If uploaded, copies the direct link to the image to your clipboard.
You can enable multiple tasks to create a powerful workflow. For example, you could capture, edit, save to a local folder, copy to clipboard, and then upload, all with a single screenshot action.
Destination Settings
To upload your screenshots, you need to configure your "Destinations." In the main ShareX window, click "Destinations." Here you can set up various file uploaders, image uploaders, and URL shorteners. For image uploaders, popular choices like Imgur are pre-configured, and you can add your own custom uploaders for specific services or servers. Once configured, ShareX handles the upload process seamlessly in the background according to your "After capture tasks."
Fixing Blurry or Mis-Sized Screenshots
Occasionally, you might encounter screenshots that appear blurry, pixelated, or are not the correct size. This usually stems from display scaling settings or specific capture methods.
Addressing Blurry Screenshots
Blurry screenshots often occur on Windows systems with high-DPI displays (e.g., 4K monitors) where display scaling is enabled.
- Check Display Scaling: Right-click on your desktop and select "Display settings." Look for "Scale and layout." If your "Change the size of text, apps, and other items" setting is above 100% (e.g., 150%, 200%), this might be the cause.
- ShareX DPI Awareness: ShareX should ideally handle DPI scaling correctly. However, if you experience blurriness, try forcing ShareX to run with system DPI awareness.
- Locate the ShareX executable file (usually `C:\Program Files\ShareX\ShareX.exe`).
- Right-click on `ShareX.exe` and select "Properties."
- Go to the "Compatibility" tab.
- Click "Change high DPI settings."
- Check "Override high DPI scaling behavior."
- In the "Scaling performed by" dropdown, select "System" or "Application." Experiment with both to see which resolves the issue.
- Click "OK" on both windows and restart ShareX.
- Capture Mode Choice: Ensure you are using the most appropriate capture mode. "Region" or "Window" captures are typically pixel-perfect. "Scrolling Capture" can sometimes produce slightly less sharp images depending on the rendering method.
Correcting Mis-Sized Screenshots
If your screenshots are consistently too large or too small, consider these points:
- Monitor Resolution: "Fullscreen" and "Monitor" captures will always reflect the exact resolution of your display(s). If your monitor resolution is very high, the image will be large.
- Region Selection Precision: When using "Region" capture, ensure you are drawing the selection precisely. The magnified view helps with this. If you need a specific dimension, ShareX displays the current width and height as you draw, allowing for accurate sizing.
- Image Editor Cropping: If a screenshot is slightly off, the built-in image editor can be used to precisely crop it to the desired dimensions after capture.
- Image Effects: Check your "Task settings" > "Image effects" settings. If you have "Resize image" or other dimension-altering effects enabled, they could be automatically modifying your screenshot's size after capture. Disable or adjust these if they are causing unintended changes.
Frequently Asked Questions
Can ShareX record my screen as a video or GIF?
Yes, ShareX can record your screen. You can find "Screen Recording" and "Screen Recording (GIF)" options under the "Capture" menu. These utilize FFmpeg, which ShareX can automatically download and configure for you, to create video files or animated GIFs of your screen activity.
How do I change where ShareX saves my screenshots?
You can configure the save location in "Task settings" > "Save image to file." Here, you can specify a default folder, enable subfolders based on date, and customize the filename pattern. This gives you full control over how your local screenshot files are organized.
Can I set up hotkeys for specific screenshot actions?
Absolutely. ShareX's "Hotkey settings" allow you to assign custom keyboard shortcuts to nearly any capture or tool action. This enables you to quickly take specific types of screenshots (e.g., region, window, fullscreen) without interacting with the ShareX interface directly.
My screenshots are not uploading. What should I check?
First, ensure "Upload image" is enabled in "Task settings" > "After capture tasks." Next, verify your "Destinations" are correctly configured. If using a custom uploader, double-check the server URL, credentials, and any API keys. Network connectivity issues can also prevent uploads, so ensure you have an active internet connection.
How do I capture a long webpage that requires scrolling?
Use the "Scrolling Capture" option under the "Capture" menu. After initiating, hover over the scrollable area (like a web browser window) and click. ShareX will then automatically scroll through the content and stitch it together into a single, tall image.
Get ShareX for Windows
ShareX is free and open source. Install it, then come back and try the steps above.
Download ShareX