ShareX Capture Settings Explained
The capture tab decides what your screenshots include, how they look, and how large the files get.
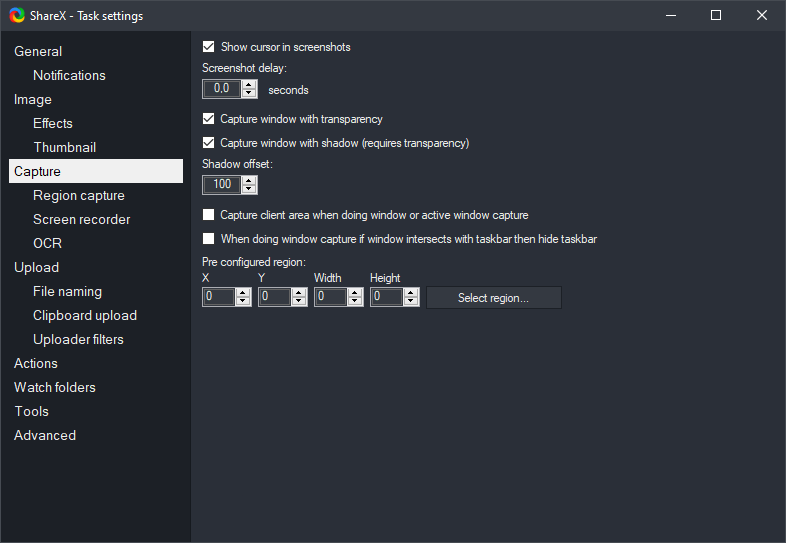
ShareX offers extensive customization for its screen capture functionality, allowing you to tailor how images and videos are captured, processed, and saved. Understanding these settings is key to optimizing your workflow, whether you're taking a quick screenshot or preparing detailed documentation. This guide will walk you through the various ShareX capture settings, explaining each option and how it impacts your captures. These settings are primarily found within the "Task settings" window, which can be accessed from the main ShareX window. By configuring these options, you can ensure that every capture meets your specific requirements, from the initial selection of an area to the final image format.
Where Capture Settings Live
The core of ShareX's capture customization resides within the "Task settings" window. To access these settings:
- Open the main ShareX window.
- Click on "Task settings" in the left-hand navigation pane.
- Within "Task settings," you'll find several categories relevant to capture, such as "Capture," "Image," and "Video."
These sections contain the granular controls for how ShareX performs its screen capture operations. While "Application settings" control the overall behavior of ShareX itself, "Task settings" specifically dictate what happens during and immediately after a capture. For a broader overview of ShareX's configuration options, you can explore
the full settings map.
General Capture Options
The "Capture" section within "Task settings" provides fundamental controls over the capture process.
Show cursor in screenshots
This option determines whether your mouse cursor is visible in the captured image. It's useful for tutorials or bug reports where showing cursor position is important. If unchecked, the cursor will not appear in the final capture.
Play sound after capture
When enabled, ShareX will play a short sound notification immediately after a capture is completed. This provides auditory feedback that the capture was successful.
Show countdown before capture
For timed captures (discussed further below), enabling this option will display a small countdown timer on your screen before the capture is taken. This gives you a visual cue to prepare.
Show desktop wallpaper in fullscreen capture
When performing a fullscreen capture, this setting dictates whether the desktop wallpaper is included. If you have multiple monitors and want a clean capture of only application windows without the background, you might disable this. However, for a complete snapshot of your desktop environment, keep it enabled.
Show quick task menu after capture
After a capture is taken, a small menu can appear near the captured area, offering quick access to common "After capture tasks" like editing, saving, or uploading. This can speed up your workflow significantly, especially if you frequently perform the same actions after a capture.
Automatically copy image to clipboard after capture
This is a highly convenient option. If enabled, the captured image is automatically placed on your clipboard, ready to be pasted into other applications like image editors, chat programs, or documents. This bypasses the need to explicitly save the image first.
Automatically open image in image editor after capture
For those who frequently annotate or modify their screenshots, this option is a time-saver. Immediately after a capture, the image will open in ShareX's built-in image editor, allowing for quick annotations, cropping, or highlighting.
Automatically save image to file after capture
This fundamental setting ensures that every capture is saved to a designated folder on your computer. You can configure the default save location in "Application settings" under "Paths." Even if you copy to clipboard or open in the editor, saving to a file provides a permanent record.
Automatically upload image after capture
For users who frequently share screenshots online, this is an essential feature. When enabled, ShareX will automatically upload the captured image to your configured destination (e.g., Imgur, your own server) immediately after capture. This works in conjunction with your "Destinations" settings. These general options lay the groundwork for
how screen capture worksin ShareX, influencing the immediate post-capture behavior.
Region Capture Behavior and Overlay Tools
ShareX's region capture is one of its most powerful features, allowing precise selection of an area on your screen. The settings here refine how that selection process behaves. For detailed information, refer to the
region capture documentation.
Show pixel ruler
When performing a region capture, enabling this option displays a small ruler that shows the width and height of your selection in pixels. This is invaluable for designers or anyone needing exact dimensions.
Show magnifier
The magnifier tool provides a zoomed-in view of the area directly under your cursor during region selection. This helps in precisely aligning your selection borders to individual pixels, ensuring crisp and accurate captures.
Show screen color picker
While selecting a region, this option allows you to pick up the color value of any pixel under your cursor. The color's RGB and hexadecimal values are displayed, which is useful for web development, graphic design, or matching colors.
Show window info
When hovering over windows during region selection, this option displays detailed information about the window, such as its title, class, and process ID. This can be helpful for advanced users or developers.
Show help text
During region capture, ShareX can display helpful on-screen tips and keyboard shortcuts relevant to the region selection process. This is particularly useful for new users learning the various region capture features.
Detect window borders on move
This setting allows ShareX to automatically snap the region selection to the borders of detected windows as you move your mouse. This makes it easy to capture entire windows without needing to manually align the selection precisely.
Snap to active window on start
When you initiate a region capture, this option will automatically highlight the currently active window, allowing for a quick capture of that specific window with a single click.
Draw rectangle on active window
Similar to "Snap to active window on start," this automatically draws a selection rectangle around the active window when region capture begins, ready for immediate capture or slight adjustment.
Show quick menu after region capture
This is a specific "quick task menu" that appears after a region capture, offering options pertinent to that specific capture type, such as "Copy," "Save," or "Edit."
Transparent background for region capture
If you capture a region that doesn't perfectly align with a rectangular window (e.g., a custom shape), this setting determines if the background outside your selection is transparent or a solid color. This is more relevant for advanced image editing.
Capture Delay and Timed Captures
Sometimes, you need a moment to prepare the screen before taking a screenshot. ShareX provides options for introducing delays.
Delay before capture
This setting, found under "Capture" in "Task settings," allows you to specify a delay in milliseconds (ms) before the capture actually occurs after you've initiated it. For example, a 3000 ms delay gives you three seconds to open a menu, hover over an item, or switch focus to another application. This is crucial for capturing transient elements on your screen.
Timed capture interval
Accessed via "Tools" > "Timed Capture" from the main window, this is a separate utility rather than a "Task setting." However, it's directly related to capture timing. Timed Capture allows ShareX to take screenshots automatically at a specified interval (e.g., every 5 seconds, every minute). You define the interval and the number of captures to take. This is useful for monitoring changes over time, creating time-lapse sequences, or documenting a process step-by-step without manual intervention for each capture. The images captured via Timed Capture will follow the general "Task settings" for image format, quality, and after-capture tasks.
Image Format, Quality, and Resizing
The "Image" section under "Task settings" is where you control the output characteristics of your captured images.
Image format
ShareX supports several image formats for saving captures. Common options include:
- PNG: A lossless format ideal for screenshots with sharp lines, text, and transparent backgrounds. It offers excellent quality but can result in larger file sizes.
- JPG: A lossy format suitable for photographs or images with continuous tones. It offers smaller file sizes but can introduce compression artifacts, especially with text or sharp edges.
- BMP: An uncompressed format, resulting in very large file sizes. Generally not recommended for everyday use unless specific software requires it.
- GIF: Best for animated captures (GIF recordings), but can also be used for static images, supporting transparency.
- WebP: A modern format offering superior compression for both lossy and lossless images compared to JPEG and PNG, respectively.
Choose the format that best balances quality and file size for your specific use case.
Image quality (for JPG and WebP)
When using JPG or WebP (lossy) formats, this slider allows you to adjust the compression level. A higher quality percentage means less compression and a larger file size, while a lower percentage results in more compression and a smaller file size, potentially with visible artifacts. For screenshots, a quality of 80-90% often provides a good balance.
Automatically resize image
Enabling this option allows ShareX to automatically resize your captured image to a specified width or height.
- Width/Height: You can enter a fixed pixel value for either width or height. ShareX will maintain the aspect ratio if the other dimension is left blank.
- Percentage: Alternatively, you can resize the image by a percentage of its original size (e.g., 50% to half the size).
Resizing can be useful for reducing file sizes for web uploads or fitting images into specific document layouts.
Crop
This allows you to automatically crop the captured image by a specified number of pixels from each side (top, bottom, left, right). This is useful for consistently removing unwanted borders or UI elements from captures.
Add padding
Conversely, you can add padding around the captured image. This adds extra space, which can be useful for presentation or to ensure consistent spacing if you're combining images.
Watermark
You can configure ShareX to automatically add a watermark to your captures. The watermark can be text, an image, or a combination, and you can customize its position, opacity, and other properties. This is useful for branding or indicating ownership.
Effects Applied Automatically After Capture
The "Image effects" section within "Task settings" allows you to apply various visual enhancements or modifications to your captures automatically. These are part of the "After capture tasks" and execute without manual intervention. To enable image effects:
- In "Task settings," navigate to the "Image" section.
- Check the box for "Apply image effects."
- Click the "Image effects configuration" button to open the Image Effects window.
In the Image Effects window, you can add multiple effects and arrange their order. Some common and useful effects include:
Border
Adds a customizable border around your captured image. You can specify the border thickness, color, and style.
Shadow
Applies a drop shadow effect, making the image appear to float above the background. You can adjust the shadow's offset, blur, and color.
Watermark
(Also mentioned under "Image format, quality, and resizing" but configured here in detail). Here you set up the watermark content (text or image), font, size, color, position, and opacity.
Pixelate
Can be used to obscure sensitive information by pixelating a specified area of the image.
Blur
Similar to pixelate, but applies a blur effect, which can also be used for privacy or artistic purposes.
Grayscale/Sepia
Applies color filters to change the image's appearance to black and white or sepia tone.
Text
Adds custom text overlays to the image automatically. This can be used for captions, timestamps, or other annotations. The order of effects matters, as each effect is applied sequentially. For instance, applying a border after a shadow might yield a different result than applying the shadow after the border. These automatic effects streamline workflows where consistent branding or privacy measures are required for every screenshot.
Presets for Documentation, Bug Reports, and Chat
ShareX's power comes from its flexibility, allowing you to create different configurations for various scenarios. While there isn't a direct "preset" feature in the sense of named profiles for all settings, you can achieve similar results by understanding how "After capture tasks" and hotkeys work together.
Customizing "After capture tasks"
The "After capture tasks" section (found in the main ShareX window) is crucial for defining workflows. You can enable or disable actions like "Save image to file," "Copy image to clipboard," "Open image in editor," "Upload image," and "Perform actions." By toggling these, you can create distinct post-capture behaviors. *
For Documentation:You might enable "Save image to file" (to a specific folder), "Open image in editor" (for annotations), and "Copy file to clipboard" (to paste into a document). You might also set a specific "Image format" to PNG with no compression for maximum quality. *
For Bug Reports:Similar to documentation, but you might also enable "Upload image" to a bug tracking system's attachment server, and ensure "Show cursor in screenshots" is active. *
For Chat/Quick Sharing:You would likely enable "Copy image to clipboard" and "Upload image," possibly with a lower "Image quality" (for JPG/WebP) to ensure faster uploads and smaller file sizes. You might disable opening in the editor for speed.
Using "Actions" for advanced workflows
"Actions" (under "Tools" in the main window, then "Actions settings") allow you to define custom commands that can be executed after capture. For example, you could set up an action to automatically open a specific image editing software with the captured image, or run a script to rename the file based on project conventions.
Hotkey settings for rapid switching
To switch between these different "presets," you leverage "Hotkey settings" (from the main ShareX window). You can create multiple hotkeys, each assigned to a different "Capture task."
- Go to "Hotkey settings."
- Click "Add" to create a new hotkey.
- Choose a "Task" (e.g., "Capture region").
- In the "Override task settings" section, you can specifically override certain "Task settings" for *only that hotkey*. This is where the magic happens.
For example: * Create a hotkey (e.g., Ctrl+Shift+D) for "Capture region." Override its "Image format" to PNG and enable "Open image in editor" and "Save image to file" to a specific documentation folder. * Create another hotkey (e.g., Ctrl+Shift+Q) for "Capture region." Override its "Image format" to JPG (80% quality) and enable "Copy image to clipboard" and "Upload image," while disabling "Open image in editor." By configuring hotkeys with specific "Override task settings" and combining them with "After capture tasks" and "Actions," you effectively create custom capture presets tailored for any scenario, from detailed technical documentation to quick sharing in chat applications. This modular approach provides immense flexibility for managing your
image capture modes.
Frequently Asked Questions
Can I capture scrolling windows with ShareX?
Yes, ShareX supports scrolling capture. You can initiate it from the "Capture" menu by selecting "Scrolling capture." This feature automatically scrolls down a window and stitches together multiple screenshots into one seamless image, ideal for long web pages or documents.
How do I change where my screenshots are saved by default?
The default save location for your screenshots is configured in "Application settings." Go to the main ShareX window, click "Application settings," then navigate to the "Paths" section. Here you can specify the directory where ShareX will save your captured images and other files.
Can ShareX automatically add a timestamp to my captures?
Yes, you can automatically add a timestamp to your captures using the "Image effects" feature. In "Task settings" under "Image," enable "Apply image effects" and then open "Image effects configuration." Add a "Text" effect and use the %t placeholder to insert the current date and time into your image.
What is the difference between "After capture tasks" and "After upload tasks"?
"After capture tasks" are actions performed immediately after an image is captured (e.g., saving, copying to clipboard, opening in editor). "After upload tasks" are actions performed specifically after an image has been successfully uploaded to a destination (e.g., shortening the URL, copying the URL to clipboard, showing a notification).
Get ShareX for Windows
ShareX is free and open source. Install it, then come back and try the steps above.
Download ShareX